
I sometimes wonder how many of us crafters go through phases.. I don't mean phases where we try different crafts, but phases where we get obsessed with a particular thing.
My current obsession at the moment is birds...I just cannot stop making them. I do love birds and always have, but this is really something else! Maybe it is because since coming to the UK, I have the opportunity to actually see birds that before I could only read about..maybe it is just another obsession.
What I do know is that I thoroughly enjoy making whatever it is I'm obsessed with.
Today I am going to share something of one of my recent obsessions - Russian dollies.
I love the way they nest inside each other, but even more than that I love the beautiful hand painted decoration on these dolls.
This tutorial makes a 2-D felt Russian dolly about 3.5 inches tall, suitable as a Christmas tree decoration.
Don't forget though that the resize button on the photocopier is your best friend.
Enlarging the pattern to 175% makes a decoration that can be placed on a shelf or mantelpiece. A simple ribbon loop turns it into a decoration to hang from a door handle.
Downsized, it can become a bag charm, or even a colourful attachment to a key ring.
Russian dolly decoration
You will need:-
# pieces of felt in coordinating colours
# embroidery thread in matching/contrasting colours
# 2 small buttons
# needle
# attached pattern
# a little synthetic stuffing
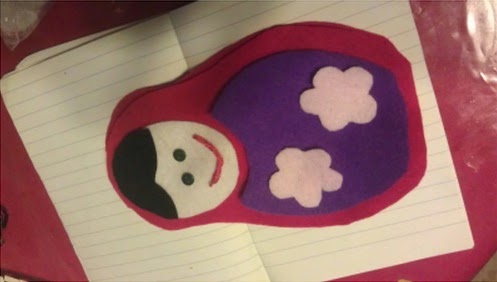
Use the pattern sheet to cut out the pieces of the Russian dolly from the felt of your choice. After you have finished cutting, you should have:-
2 x Russian dolly shaped piece, 1 x pinafore piece, 1 x hair piece,
1 x face piece, 2 x flower piece

1. Take one of the Russian dolly pieces. Position the pinafore piece in the center of the lower half. Fix in place with pins if necessary.

3. Position the flowers on the pinafore, and sew those in place. (You might want to sew the flowers onto the pinafore before actually sewing it onto the body).

4. Take the face piece and sew on the buttons for the eyes. Use black thread to slipstitch eyebrows and a nose. Do the same with pink thread to make a mouth.

5. Position the face in the center of the upper half of the Russian dolly and sew it in place.
6. Position the hair piece above the face and sew in place using black thread. Keep your stitches small and regular to avoid giving your Russian dolly a zombie-like appearance.
7. Now layer the top and bottom pieces of the Russian dolly on top of each other. Blanket-stitch around the shapes, sewing the two together. Don’t forget to allow space for you to insert the stuffing.
8. Stuff your Russian dolly and finish off by sewing the gap closed using blanket-stitch
.
9. If you would like to hang your Russian dolly, simply thread a ribbon through the back of her head and knot.
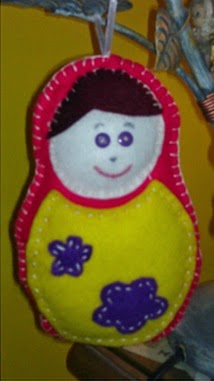
 |
| One of my Russian dollies hanging from our tree. |
You could omit the back part of the pattern, stitch as usual and sew it onto a plain shopping bag. Your shopping bag will be truly unique!
This Russian dolly is also available as a make-it-yourself kit from my shop (currently I am experiencing some problems with my online shop, which I hope to sort out soon..thank you for your patience) In the meantime, if you are interested, I can take orders via the comments to this blog or even on fb.
I hope you enjoyed this post. See you next Friday!!
No comments:
Post a Comment