Powered By Blogger

Friday 27 February 2015


Last post for this month.. And our first full month of posting in our revamped version.. How do you like the new "look" we've given to the blog, the make-it-yourself sessions, and the book review?  What do you think of the little-bit-of-everything posts which hit your inbox every Friday?

This will be the last Friday post for this month, and in it I will be putting together some of stuff that inspired me during this past month. I hope you will enjoy, and that you might find some inspiration here yourselves.


I came across this as I was working on one of the earlier posts this month.. I believe that we all can achieve, if we work at what we really want. However, encouragement and reminders are always welcome.
Here are some which I found this past month.


I don't know about you, but my tablet and mobile phone's memory have a definite chunk taken up by these messages, which I am saving all the time.


My obsession with birds...honestly, even I cannot find a better word to describe it...means that I have been trawling the internet for images, tutorials, pictures and patterns of birds. As I said last week, since coming to live here, my experience of so many different species of birds...and not just birds...has thoroughly expanded.
I have found a wonderful blog, DownEast Thunder Farm (www.downeastthunderfarm.com) hosted by a lovely lady called Susan, which has amazing bird patterns.  The patterns are very detailed, complete with markings and colourings and above all are free for personal use...
This lovely lady has dozens of bird patterns, including the wren, peacock, several types of owls, pheasant, rooster, kingfisher, crow, magpie, to name a few. She is based in Maine, so yes, there are some birds which are found in the US rather than the UK. And conversely, some birds which are pretty common here, like chaffinches, blackbirds and bullfinches have not yet made it to her list....something which I hope to work on too.
They can look really spectacular when worked in the correct colours..

At the moment I have two or three different things going on that are related to this bird-obsession of mine..well, I'm teaching my children about birds in this way, helping them identify the different birds which come down in our garden, so it's all good.


Obviously my Maltese heritage is a big source of inspiration to me. Now you've all heard of "sunny Malta"... these are some pics I got off the internet of Malta looking not quite so sunny during the past month..

We've come to the end of February already... I'm more than glad to welcome March and have some warmer weather roll in.. I know, maybe by UK standards it is normal at this time of the year, but to someone coming from an island where the temperature hardly ever drops below 10°C, this feels, like....aaargh! real cold.


One of the things I love about living here is the wood floors...no, I don't like that they creak so much. Maltese houses have tiled floors, mostly..and with the high levels of humidity, there is no way I'd be sitting on the floor like this on a winter's day..
I love that I can do it here.

Have you been inspired?? Write in and let me know... The aim of this blog is to share inspiration and ideas and tips. Me sharing with you, and you sharing with the rest of us....So please get commenting, people!
See y'all next week.

Tuesday 24 February 2015

MIY Session 3 :- Box-Frame Noticeboard

Like I said a couple of posts back, I had been wanting to do this project for a long time. I wanted a noticeboard that kept all my different appointments grouped according to days, rather than one big jumble of notices and letters.
So, as promised..here is the tutorial for the Box-Frame Noticeboard.

You will need :-
        # a box frame
        # some paint (I used white and teal tester pots)
        # Mod Podge
        # some patterned paper
        # some thin wire
        # six/seven wooden pegs (I used six, combining Saturday and Sunday on one peg)
        # wood glue
        # smaller paintbrush
        # fine grade sandpaper

1. Take the box frame apart. Remove the back and 'discard' the picture mount and glass. Separate the two parts of the box frame.


2. Lightly sand the frame and then wipe it off. This will remove the fine dust raised by sanding. Allow the frame to dry.


3. Paint the frame with white paint. Make sure you paint the inside of both parts of the frame (otherwise you'll be surprised by unsightly unpainted patches). Allow to dry.


4. While the paint is drying, start working on the back part of the frame. This will be the background for your noticeboard, so be sure to choose patterned paper that will fit in with the final paint colour you have chosen for your frame.


5. Apply some wood glue to one side of the board (the back of the frame). Lay the paper on top of the glue, and rub over it gently with your hand to push out any air bubbles.


I used a patchwork of papers, but if your paper covers the entire board, that is fine too.


6. Trim off any excess paper and lightly sand the edges of the board. Apply some extra glue to the corners of the board to ensure that the corners of the paper are firmly stuck down.

7. Give the whole board a light coating of Mod Podge or varnish.


8. If your frame has dried sufficiently, paint it in your chosen colour. Once again, be sure to paint the insides of the frame as well. Allow the frame to dry.


9. When the frame has dried sufficiently, start putting it together again. Slip the ends of a piece of wire between the two parts of the frame, twisting to secure. Before securing completely, make sure the wire is taut.


10. Grab some pegs and write the days of the week in Sharpie pen, and hey presto! you're done.

Bonus Idea :- If you wish, you can paint your pegs in the same colour as the frame. Print out mini-labels with the days of the week. Cut them out and stick them onto the pegs using wood glue (do not be tempted to use superglue for this). Finish off with a light coating of varnish.

These are mine...


So there you are...a simple way to organise all your appointments and meetings. And the bonus is that since you are painting it, you can customise the colours to co-ordinate with the rest of the room where you will be using it.
I hope you enjoyed this tutorial..and you will be inspired to make something yourself. Please send in pictures of what you do make.. I would love to share them here.

See you next Friday. Cheerio!

Friday 20 February 2015

What I've been doing this week... 3

Hiya there!
How was your week? Ours was good; half-term meant me and the hugglemosters had time to enjoy some walks, a visit to McDonalds, and on rainy days (like yesterday) time to play board games, bake and watch TV together. For me, the absence of the crazy morning rush was lovely.

Back to us...

Last week, I put up a picture of my new TV-remote-control holder (Mrs.Owl) and some of  you asked me for the details, so I am including them here.

I don't know about you, but in my house, one of the two remote controls tends to go missing pretty regularly.. or maybe, now I should say 'tended' 😜

More often than not the culprit was my five-year-old, who labouring under the delusion that he is the king of the remote, carried it with him everywhere around the house.. and I mean everywhere.

Taking it with him meant inevitably, that he'd leave it in different places. Cue desperate hunting as soon as its absence was felt. Said hunting could take up to an hour, as we literally turned the house upside down. I have even been known to go through the kitchen bin, out of pure desperation.. I know, YUCK!! seriously yuck, but it has to be somewhere, right?

Some weeks ago, anyone looking into our house at around 8.30pm would have seen this kind of activity going on every single night. For a week. Every single night.

Enough was enough... something needed to be done.

A quick Pinterest search yielded pattern and instructions for Mrs.Owl (all for free, thanks to Jessie Gray of dimplicity.com)

http://www.dimplicity.com/2013/07/owl-remote-control-caddy-tutorial-pattern.html

The instructions and pattern are all included in the link, but if you find any problems please let me know and I will attach a scanned copy.


As you can see from the picture, the finished product is pretty, but more importantly, it works!

No more lost remotes. Hallelujah! Mrs. Owl gathers them all in her pockets everyday.
How about you? do you also have remotes that go AWOL? Do you have any storage solutions that work for you?

Before I go, I want to share with you the recipe for some lovely yogurt brownies that we made yesterday.. The recipe came from a dear friend and fellow blogger Lorraine Hussain.

Lorraine's Yogurt Brownies
     1 cup self-raising flour
     150gr chopped chocolate
     1 cup sugar
     1 tspn vanilla
     1/2 cup cocoa powder
     1 1/3 cup yogurt
     1/2 cup white chocolate chips
     1/2 cup chopped almonds
     1/4 cup chopped nuts/marshmallows/choc chips (to decorate the top)

Melt the chocolate using the bain marie method. Whisk in the dry ingredients, except the flour. Fold the wet mix into the flour. Add the white chocolate chips, and the chopped almonds.
Spread the mixture in an 8x10" floured, greased dish.
Sprinkle 1//4 cup chopped nuts/marshmallows/ white chocolate chips on top and bake in a moderate oven, until firm.


One word. Divine..sticky, but divine. Seriously, this is the kind of stuff you need after a hard day at work, and coming home to find three bills on your doormat..comfort stuff!!!

See you all next week! Please do write in with pictures of your creations (including edible ones). I will be more than happy to feature them.

Tuesday 17 February 2015

DIY Session 2: Russian dolly decoration


I sometimes wonder how many of us crafters go through phases.. I don't mean phases where we try different crafts, but phases where we get obsessed with a particular thing.
 My current obsession at the moment is birds...I just cannot stop making them. I do love birds and always have, but this is really something else! Maybe it is because since coming to the UK, I have the opportunity to actually see birds that before I could only read about..maybe it is just another obsession.
What I do know is that I thoroughly enjoy making whatever it is I'm obsessed with.

Today I am going to share something of one of my recent obsessions - Russian dollies.

I love the way they nest inside each other, but even more than that I love the beautiful hand painted decoration on these dolls.
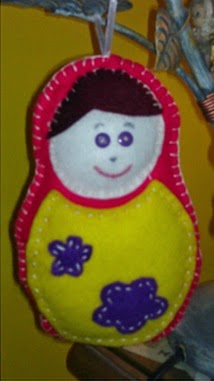
This tutorial makes a 2-D felt Russian dolly about 3.5 inches tall, suitable as a Christmas tree decoration.
Don't forget though that the resize button on the photocopier is your best friend.
Enlarging the pattern to 175% makes a decoration that can be placed on a shelf or mantelpiece. A simple ribbon loop turns it into a decoration to hang from a door handle.
Downsized, it can become a bag charm, or even a colourful attachment to a key ring.

Russian dolly decoration

You will need:-
 # pieces of felt in coordinating colours
 # embroidery thread in matching/contrasting colours
 # 2 small buttons
 # needle
 # attached pattern
 # a little synthetic stuffing

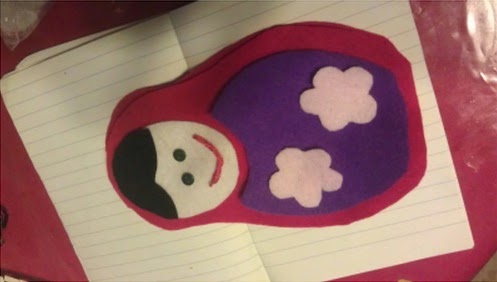
Use the pattern sheet to cut out the pieces of the Russian dolly from the felt of your choice. After you have finished cutting, you should have:-
2 x Russian dolly shaped piece, 1 x pinafore piece, 1 x hair piece,
1 x face piece, 2 x flower piece


 Instructions:-

1. Take one of the Russian dolly pieces. Position the pinafore piece in the center of the lower half. Fix in place with pins if necessary.


2. Sew the pinafore piece in place.

3. Position the flowers on the pinafore, and sew those in place. (You might want to sew the flowers onto the pinafore before actually sewing it onto the body).


4. Take the face piece and sew on the buttons for the eyes.  Use black thread to slipstitch eyebrows and a nose. Do the same with pink thread to make a mouth.


5. Position the face in the center of the upper half of the Russian dolly and sew it in place.


6. Position the hair piece above the face and sew in place using black thread. Keep your stitches small and regular to avoid giving your Russian dolly a zombie-like appearance.

7. Now layer the top and bottom pieces of the Russian dolly on top of each other.  Blanket-stitch around the shapes, sewing the two together. Don’t forget to allow space for you to insert the stuffing.

8. Stuff your Russian dolly and finish off by sewing the gap closed using blanket-stitch
.
9. If you would like to hang your Russian dolly, simply thread  a ribbon through the back of her head and knot.


One of my Russian dollies hanging from our tree.

Bonus Idea!!
You could omit the back part of the pattern, stitch as usual and sew it onto a plain shopping bag.  Your shopping bag will be truly unique!

This Russian dolly is also available as a make-it-yourself kit from my shop (currently I am experiencing some problems with my online shop, which I hope to sort out soon..thank you for your patience) In the meantime, if you are interested, I can take orders via the comments to this blog or even on fb.

I hope you enjoyed this post. See you next Friday!!


Friday 13 February 2015

What I've been doing this week 2


So...here we are back to Friday again... And my post drops into your online consciousness once more...
What has your week been like? Mine has been rather poorly...having a child sick with a seemingly persistent and recurring bug does have that effect, doesn't it??

Anyways...time to show you what I've been doing. I've quite a bit to show you, as I kept myself busy. A whole week stuck indoors, I need to find stuff to do, or I'll go stir crazy..


This is a project I've been meaning to do for some time now....all in the name of getting organised. I don't know about you, but I have this huge corkboard in the kitchen that I pin all those school letters and appointment cards to. And when you have lots of things stuck to a board, it is easy for papers to overlap and get overlooked.
So, I wanted something I could stick right up above my desk, something I could use to keep each day's stuff together in a neat(er) way.
I saw a similar concept in a shop..a corkboard subdivided into sections, but the frame did not match my colour scheme. Also, to be honest, I wasn't quite so sold on the idea of yet another corkboard. Then I saw a picture in a magazine. And I took it from there, I guess... All I needed was a box frame I'd bought on sale, and a couple of tester pots of paint..
I'll put it all up, step-by-step with photos in next week's blog.

What else?

This is something I did with the leftover paint....what can I say? It was for the same room...and I wouldn't waste leftover paint, anyway.
I had this wonky reading lamp, always listing to one side..the problem was that the bolt linking the base to the stem was too short. After several unsuccessful attempts to fix it, I finally hit on the idea of using an upended flowerpot to stabilise it. Some superglue and it was steady. Success!!!

Of course I wouldn't be happy with a plain terracotta pot,would I ?? (seriously!! what would you expect ??)
So, with the leftover paint in my tester pots, I painted it. To make the design, I traced around the template of a heart lightly, with chalk and then filled it in with white paint...


    I'm really happy with how both projects turned out.

That's all for today..I know some people expressed an interest in the TV-remote holder (Mrs. Owl) from when I put it up on Facebook. I promise to give you the full details soon.
What did you think of last Tuesday's book review? Did you find it informative ? Would you like it to be a regular feature of this blog ?

One last thing. I am currently working on some new projects and I would appreciate some feedback. These are hedgehogs, for small type accessories like key fobs and bag charms.


So, would you choose A or B ??


And again..A or B ??

Thanks in advance.. And, if you've been bitten by the crafty bug, do get back to me and post here..

See you on Tuesday. Ta. xx


Tuesday 10 February 2015

Book Review: "Crafty Creatures" by Jane Bull


 "Crafty Creatures" (Jane Bull)
2013,
DK Ltd (London)
ISBN 978 -1- 40932 - 113 - 2

This book cover urges you to "follow the steps to sew and knit the cutest critters".  And indeed, each project has step-by-step instructions making them feasible even for a beginner. The book touches different crafts, including sewing, knitting and stitching, in animal-inspired projects.

The projects are divided into four sections... Woolly Animals, Friends in Felt, Sew Cute, and Animals in Stitches. There is also a final section called Sewing Kit and Useful Know-How. This section is particularly useful if you're new to stitching.

Woolly Animals shows us how to make a variety of knitted animals..kittens, ducklings; not all the projects require knowledge of knitting, though. I particularly liked the very easy to make woolly octopus.
Also, if you happen to have any singleton socks or mittens (I don't know about you, but I get them with depressing regularity) this  section shows you how to turn them into cute, little cuddlies.

Friends in Felt and Sew Cute must be the best sections in the books, at least for someone who loves sewing like I do. With clear and easy to follow patterns, all you need are pieces of cotton or felt, a few odd buttons, your trusty needle and thread, and you will be making bugs, dogs, elephants and ponies in no time... I don't know about you, but I love projects that come with the relevant patterns; it makes life so much easier.

Animals in Stitches reminded me of the famous wedding dress Angelina Jolie wore to her wedding to Brad Pitt. (I LOVED that dress; it was such a lovely way to immortalise the children's artwork). This section demonstrates how to transform our pen-and-paper doodles into stitched works of art ..think of how that could add wow factor to a linen bag or even to a plain tee-shirt!!  It also has some ideas for simple cross-stitch patterns of animals..these are really easy to make, even for a child or an absolute  beginner.

In the final section of the book the author demonstrates a number of different stitches, something which will definitely be handy if attempting the doodle art mentioned above. In this section, there are also the basics of knitting. Personally, I have no idea of knitting, and since I would love to make up one of the woolly animals, I will definitely be using this handy guide.

Overall, I think this is a worthwhile buy if you are still a beginner. The simplicity and straightforward-ness of the projects are also ideal if you're a seasoned crafter trying out a new craft, or if you simply need to make up something in a hurry.

Have you found this book review helpful?? Please let me know..
Cheers! See you Friday!

Friday 6 February 2015

What I've been doing this week 1

Friday morning it is! Tgif anyone?

Personally I appreciate knowing that for the next two days I won't have to deal with the daily scramble to get two very reluctant children into their coats and scarves while rushing to get them to school in time. Even if after the weekend it starts all over again

So... Time to give you lovely people a bit of a heads-up on what's happening with Oh SEW Lovely..

First of all, apologies for having disappeared off the blogging radar for two entire months..
Christmastime is always a very busy time, and since I moved recently, most of my custom orders were for overseas, which meant tighter deadlines. The last of those orders was completed practically one week before Christmas, when I had to start catching up with my own Christmas prep. Our first Christmas in the UK was lovely; we all duly stuffed ourselves with food and opened presents; my daughter complained bitterly about the lack of a white Christmas, though I must say we've had some lovely snow this past week.


January brought its dreaded bout of flu with fever and sniffles and cough medicine..which everyone in this family hates. Are we the only ones who think it tastes disgusting, I wonder?

BUT ...and this is the exciting part...during January I also began working on giving this blog a makeover. Yep, during the last month, I've been doing a lot of behind-the-scenes work, if you like. I'm a great believer in self-improvement, and I was lucky enough to find a very user-friendly blogging mini - course, run by consultant Stacy Rust of stacyrust.com who must be one of the most approachable persons I've ever met. Thank you so much Stacy for all the inspiring tips and knowledge you passed onto me for free. The improvements you will be seeing in this blog (which I hope you will like) are down to having followed her blogging course.
In case you are interested in learning more about having your own blog, head over to Stacy's page, stacyrust.com, and check out her blogging resources.

So.. As you may have noticed last Tuesday...erm, Wednesday.. my post was a DIY session.. I love finding these kind of posts on other blogs, as very often when I see something I like, I'll be itching to make one like it myself.. So I hope you will enjoy them. DIY sessions come complete with any patterns needed, so that you can actually make the item in question yourselves.

A few more new things will be coming up...a Book Review post once a month, where I review a craft-related book.. I don't know about you, but I buy LOADS of craft books online, and it is sometimes a bit of a hit and miss thing for me. Having someone review my book choices and give me an idea of what a book is all about would help.

I am currently scanning the internet for easy, doable crafts for Mothering Sunday, which I hope to share with you as the day comes closer...

I sincerely hope you will like the 'new-look' blog. Please do get back to me and tell me what you think. The most awesome blog is nothing without your following and feedback..

This blog is mainly about crafting..but while I am a super-avid crafter (just ask my husband) I am also a mum of two young children, with a fondness for baking. So, expect to find a recipe posted here and there. After all, what could be better than crafting with a delicious slice of cake to hand?

This week I decided to try cookies;a different type of cookie from the ones I usually bake. A quick rummage through my baking books yielded the following Apple Cookies recipe..and as a bonus, it used up some older apples that I had sitting in my fruit bowl.

Apple Cookies


You'll need:- 225gr sugar, 110gr butter, 1/2tsp vanilla extract, 1 apple, finely chopped, 225gr plain flour, 1/2tsp salt, 1tsp baking powder, 1 tsp bicarbonate of soda.

Method:- Heat the oven to 180°C. Line two baking trays with non-stick baking paper. Beat  the sugar, butter and vanilla in a mixing bowl until light and creamy. Stir in the apple. Sift in the dry ingredients and mix well. Roll the mixture into small balls and place well apart on the baking trays.  Bake  for 8-10 minutes until golden. Cool on the baking trays for 5 minutes, then transfer to a wire rack to cool completely.


If you can resist biting into them while they are still warm, you are better than me!! Fragrant, warm, delicious....yummmmm!
So i will leave you to it then. Happy baking!

One last word...
As you may know, Oh SEW Lovely is not merely the name of this blog. It is also the name of my online store which is currently hosted on The Crafter's Barn. Some changes are coming up there as well soon, so watch this space for more news. You will hear about it here first.

See you next Tuesday! Cheers!

Wednesday 4 February 2015

Do It Yourself......Hand-Knitted Coasters

 I don't know how many of you had one of these as kids... I know I did. The name is "knitting Nancy/Nathan"; it is also called French knitting, or spool knitting. My daughter got one last year, and it spurred me to look up mine from the olden days....so you are looking at real vintage "knitting dolly" ..taa daah!

This is at least 32 years old! 


Obviously, I didn't limit myself to just dusting it off.. I began knitting away, and several knitted strands or 'rope' lengths later, this was the result...


The following are simple step-by-step instructions of how to create these hand-knitted coasters (including how to use the knitting dolly)

1. Slip the tail of your wool down the middle of the dolly.

2. Start with a simple loop around any peg on the knitting dolly (this shall be the starter peg).

3. Move onto the next peg to the right winding the wool round the peg from back to front and back again.

4. Repeat this for all the remaining pegs; once you have looped wool around all four pegs, repeat the process so that each peg has two loops of wool wound around it.

5. Beginning at the starter peg, use your crochet hook to lift the lower loop up and over the upper loop and over the peg. Repeat this for all the pegs.

6. Keep repeating this process over and over until you achieve the desired length of your piece of knitting.

7. Once you have achieved the length you desire, close off the piece of knitting. (You will need approximately 30cm for this project.) Snip off the ball of wool with a few inches to spare. Beginning from the starter peg, simply thread the remaining bit of wool through the loop and lift it off the peg. Do this with all the pegs, until you have a finished 'rope' of knitting in your hands.

8. Starting from one end, begin curling the length of 'rope' on itself, stitching the ensuing circles together as you go along. Once you've stitched the whole length of your 'rope' you should have a flat circle...and that's your first coaster.


You might want to spray your coasters with some waterproof spray. This will make it possible to easily wipe off any small spillages, thus preventing staining. 

There are plenty of online video tutorials explaining how to use a knitting dolly, if you would prefer to see this being actually done, rather than read instructions. The link below is to one that I think is particularly good. Hopefully, I will also be uploading my own video tutorials soon.
https://www.evernote.com/shard/s537/nl/95775092/f555aa20-269a-4296-97ca-69b9479e6117

I hope you enjoyed this first post in the newer, revamped version of this blog..(more on that in next Friday's post). I intend to make these DIY posts a regular feature of this blog.
My apologies as this post was meant to have gone out yesterday, but technical issues got in the way..

Byee! Catch up with you on Friday!